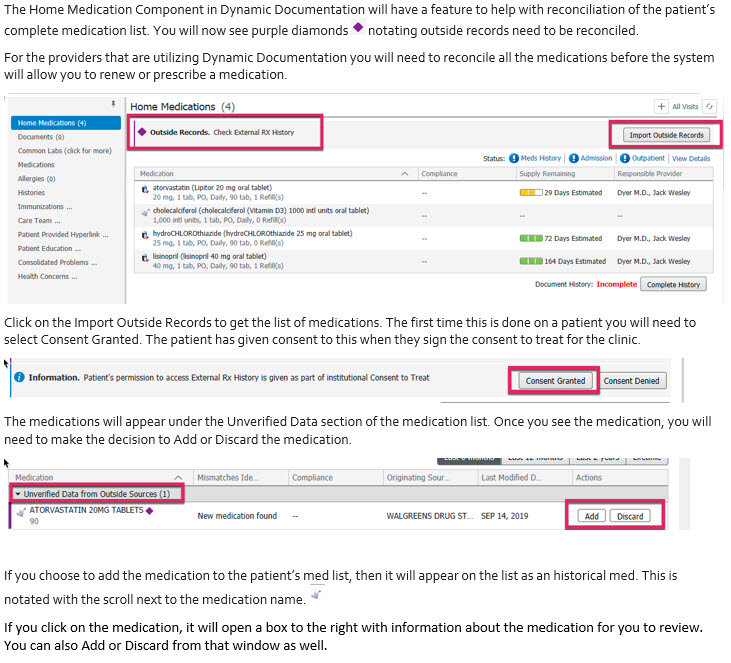
Home Medication Reconciliation in DynDoc
Discharge Workflow for Dyn Doc Providers
Proper workflow is imperative for the information to flow into the DC Summary Note. If the steps are done out of order, information on the DC Summary Medications may be inaccurate.
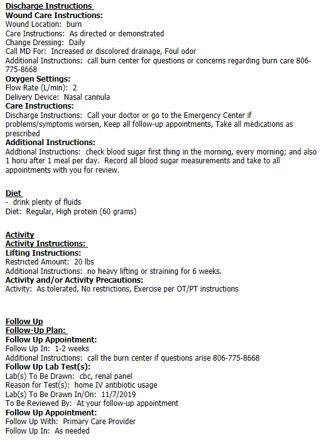
- Place Adult Discharge Plan and complete required instructions
- This can be done at any point during the hospitalization and is multi-contributor workflow
- Consultants are able to add their follow up appointments to the discharge plan along with primary teams for added continuity of care
- This can be altered at any time if plans change
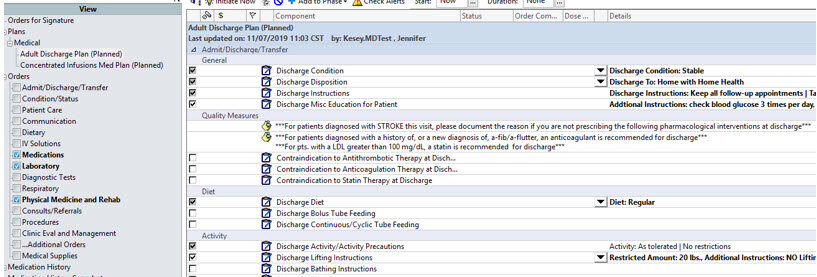
- When the patient is ready for discharge, place the Discharge Patient order on the chart.
- Nursing will Initiate your pre-completed Adult Discharge Plan.
- After you have ordered the Discharge, complete the discharge medication reconciliation process. Click on Discharge from the Reconciliation drop down menu on the Order and Medications page.
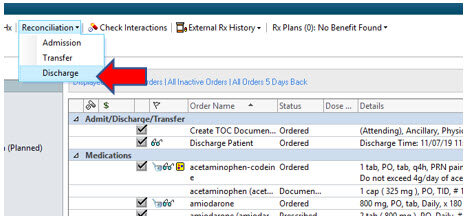
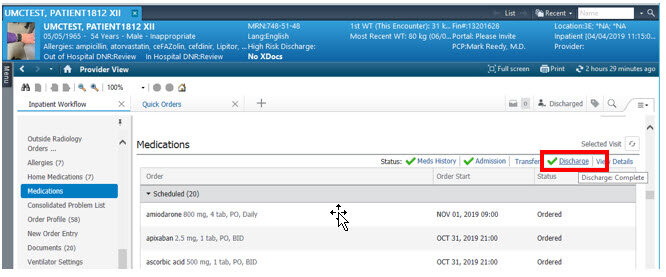
- You can also complete this step from the DynDoc Provider view. Click on the Medication component on the left menu list, then click Discharge.
- Once you have completed the medication reconciliation, click Reconcile and Sign
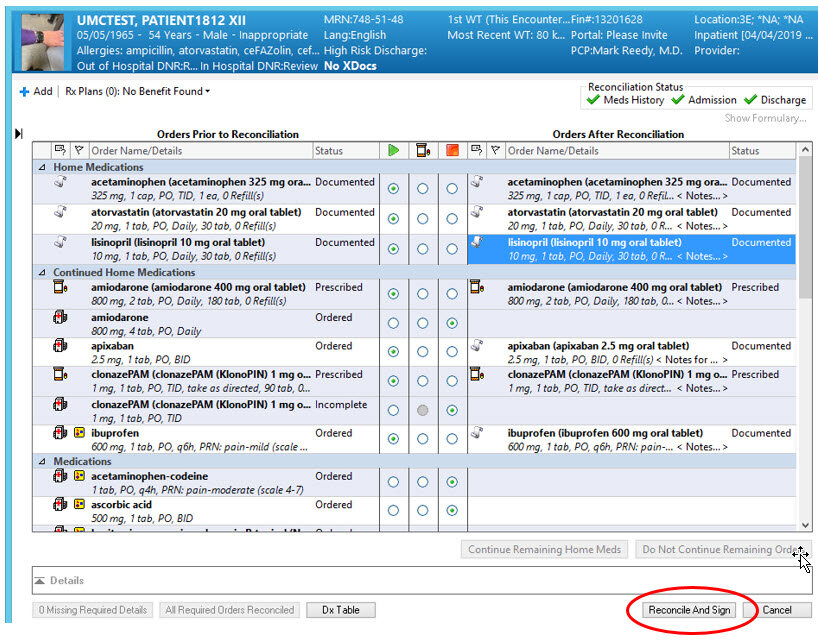
- A green checkmark will appear next to Discharge in the Reconciliation Status Box in the Order Section.
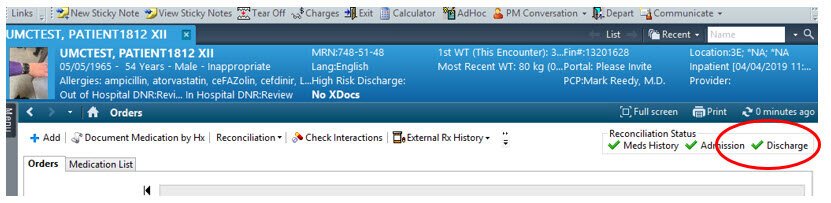
** You have now completed the process to discharge the patient **
- You are now ready to complete the Discharge Summary for the hospitalization. From the DynDoc MPage view, scroll to the bottom and click on UMC Discharge Summary.
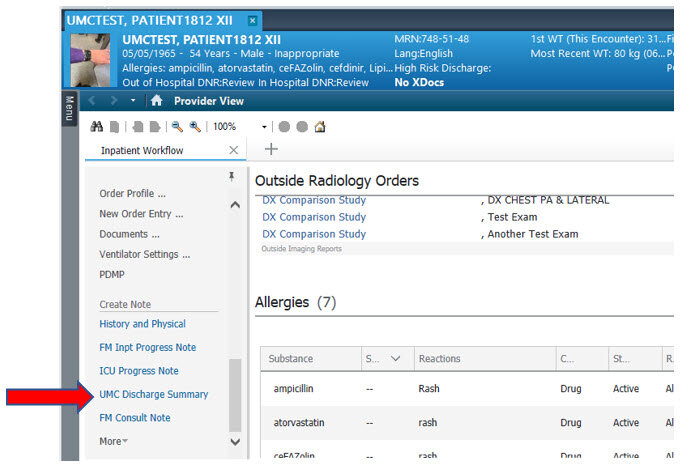
- This will open a note window. All portions of your Adult Discharge Plan order will appear on the DC Summary automatically.
- Any content added from the Hospital Course Component will appear on the DC Summary automatically.
- This content is from the Adult Discharge Plan order placed on the chart. If you do not complete the Discharge order process (described above) before you begin the note, none of this information will populate into the note.
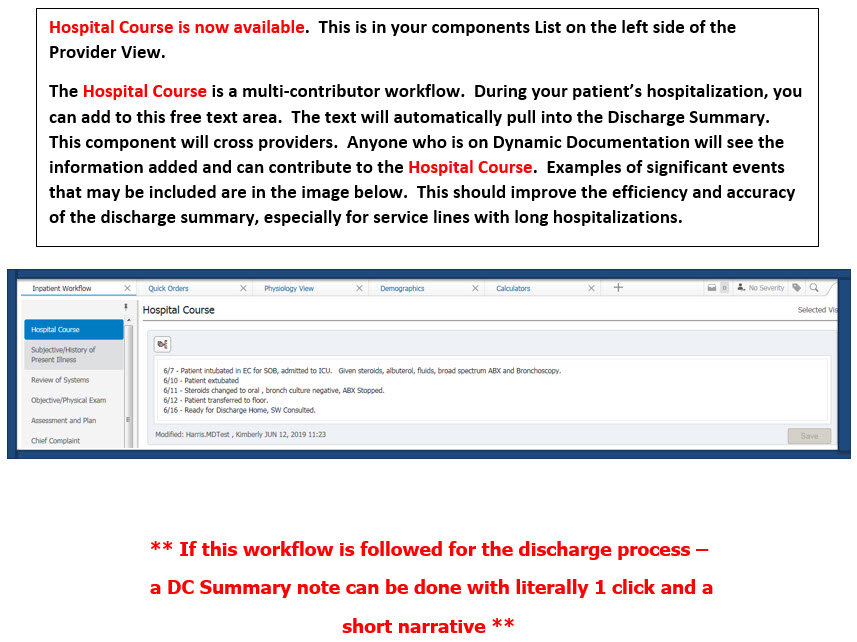
- This content is pulled from chart data. Note the Hospital Course component. This is data entered in the Hospital Course component throughout the hospitalization – This makes the DC summary much easier with significant events already highlighted for you.

More Information on the Hospital Course component on DynDoc Provider view:
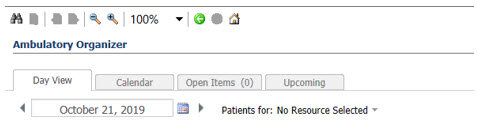
Ambulatory Organizer: Choosing a New Resource
Choosing a New Resource in the Ambulatory Organizer
Click on Patients for: No Resource Selected
Search for the resource in the search box

Check the box beside the name
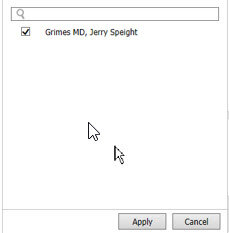
Click Apply to save your changes
Orders to Scheduling: Scheduler's Workflow
What: Order to Scheduling go-live, August 4th
Who: All clinicians and end-users who order and/or schedule any radiology orders, PT/OT, Rehab orders (e.g., MRI, CT, US, CV, Mammograms, NM, etc.)
*Does NOT apply to Perinatal Center or GYN ultrasounds or plain DX films
WORKFLOW FOR PROCEDURE SCHEDULERS:
- Order placed and task to task list for scheduler (if applicable)
- Prior-authorization completed (check radiology department if questions)
- Scheduler calls for appointment, as usual
- Before hanging up, scheduler logs into Scheduling Appointment Book
- Button located either in AppBar or Powerchart Organizer Toolbar
- From YOUR Request List Queue, find your patient
- Scheduler right clicks on patient and selects “MOVE REQUEST”
Medicare Medical Necessity Checking
Click the link for a handout tutorial on Advanced Beneficiary Noticies with Medicare patients and Medical Necessity Checking.
What: Patient Status Order (PSO), Medicare Medical Necessity, and Order to Scheduling go-live
When: Go-live will coincide with Cerner Registration & Scheduling go-live, August 4th
Who: All clinicians and end-users who order and/or schedule any radiology orders, PT/OT, Rehab orders (e.g., MRI, CT, US, CV, Mammograms, NM, etc.)
*Does NOT apply to Perinatal Center or GYN ultrasounds or plain DX films
FOR MEDICARE PATIENTS ONLY:
If an inappropriate diagnosis is placed with a testing order, you will have to either:
- Select the proper diagnosis (icon goes away), or
- Fill out the advanced beneficiary notice (ABN) and explain to the patient the cost of the test that will not be covered by Medicare, as the incorrect diagnosis code has been applied
- Diagnosis codes determined by CMS
- Will always qualify for mammogram exams due to frequency rules
- If not addressed, and is a schedulable test, this will be prompt those scheduling the test that an ABN is required
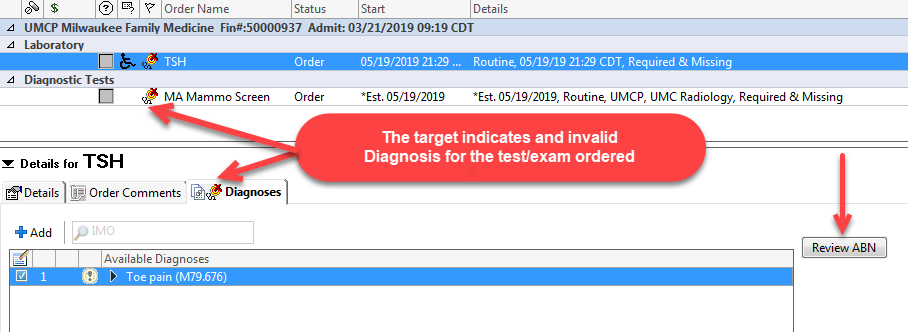
Medical Necessity ABN Checking – In Summary
-
- Qualifies ONLY for Medicare Patients
- CMS defines imaging and lab tests that must have a valid diagnosis
- When a test is ordered without an applicable diagnosis
- A target will appear with a “Review ABN” button
HOW to RESOLVE
-
- Add an applicable diagnosis for each specific order
- OR perform the “Review ABN” process, have form signed and scanned
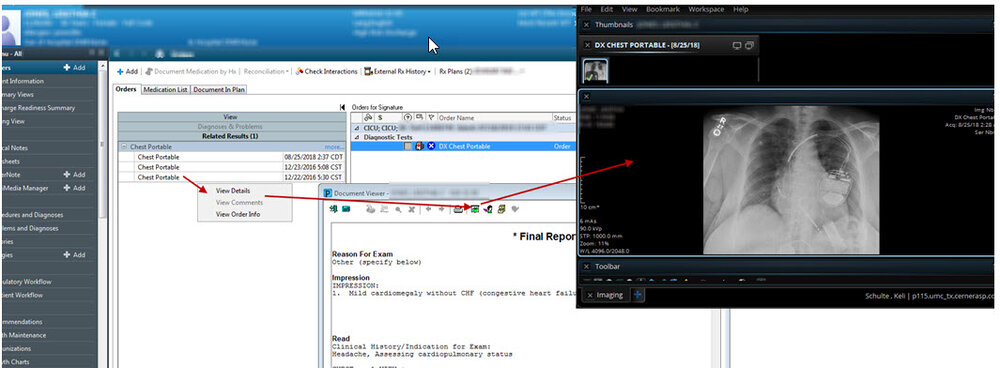
Related Results Functionality
Related Results is functionality that allows for existing results to be displayed when placing orders.
When the order is added to the scratchpad, the 3 most recent reports/images will display in related results. Clicking “more…” will display more reports/images.
To view the report/image, right click on the result and select “View Details”.
**note- we are still working on getting images for echos, but the reports are there.
Right now this is on for all echos, and chest x-rays.
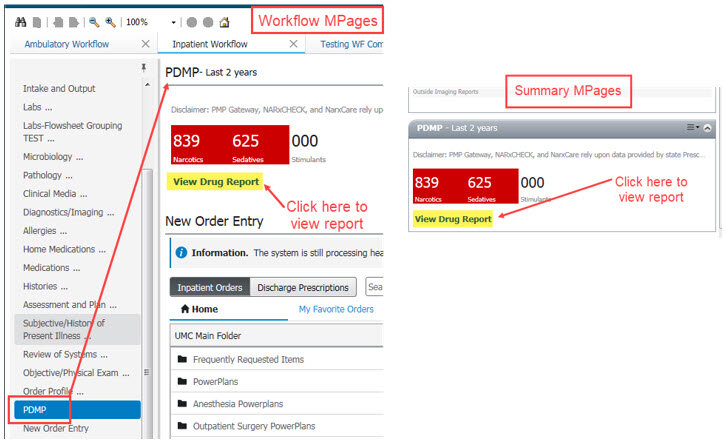
PDMP Information for PowerChart
On March 1, 2020, the requirement will go into effect for pharmacists and prescribers to check the Prescription Drug Monitoring Program (PMP) history before dispensing or prescribing opioids, benzodiazepines, barbiturates, or carisoprodol. To make this easier and improve compliance, we are bringing the PDMP information to PowerChart via the MPages.
There is a new component on all provider-facing MPages that will launch a new window linking out to the state PDMP. This link does not require additional credentials. It is updated real time as the state PDMP is updated with new prescriptions.
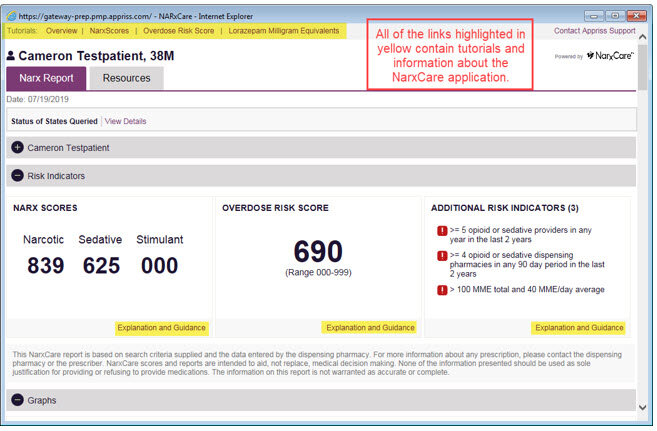
Things you need to know:
Providers MUST click the “View Drug Report” link for the state to keep record that the PDMP was accessed prior to writing a prescription. Just looking at the score on the MPage does not count.
The report gets more specific as providers move down the page (see examples on page 2).
There are tutorials and informational links throughout the drug report that link out to information like how the NarxScore is calculated or what the Overdose Risk Score means.
The last digit in the score means that there are that many current, active prescriptions of that type for this patient. (ex: 839 narcotics score from the picture above = 9 active narcotic prescriptions)

How to document you consulted PDMP in your Note
Dynamic Documentation Users:
The EMR Team has created a global autotext of “;substancescreening” for you to add to the appropriate section of your note. You will notice when you enter the autotext, it will pull in the statement “Review of opioid prescriptions performed and screening for SUD completed.” Please add this autotext to your personal list to ensure you use it when necessary.

Powernote Users:
In the Medicare Annual Wellness Exam encounter pathway, the EMR Team has added the verbiage of Review of Opiod Use as a required field to complete the note in the Review Management section. Please select the statement of “Review of opioid prescriptions performed and screening for SUD completed” when appropriate.

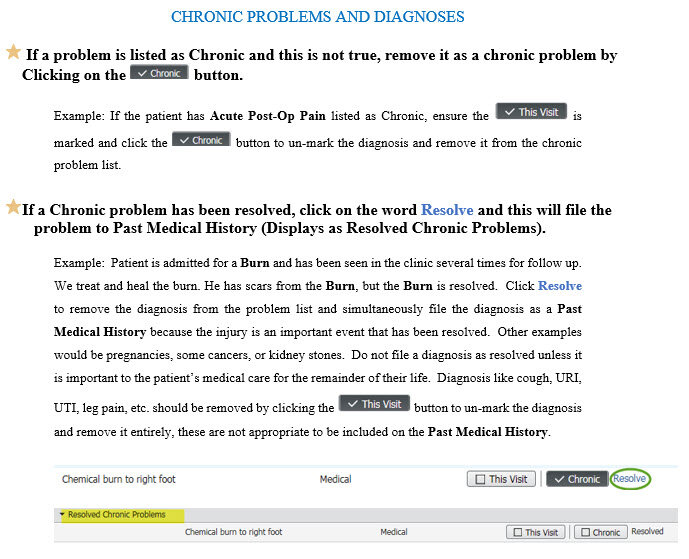
Dynamic Documentation: Problems & Diagnosis
Managing Problems and Diagnoses from the Workflow Components – Tips and FAQ’s
A well-managed problem list will reduce queries, make your notes cleaner and provide advantages in the clinic setting.
DNR Consent and Order
The 2017 Texas Legislature added new Subchapter E to the Health & Safety Code Chapter 166, entitled “Health Care Facility Do-Not-Resuscitate Orders.” The new law establishes requirements for the issuance of a DNR order.
INPATIENTS: The law applies to patients who are admitted to UMC under observation or an an inpatient. This does not include outpatient settings such as radiology, clinical laboratory, Southwest Cancer Center, home health, outpatient rehab, and emergency center. Four outpatients areas, continue to honor the Texas "Out-of-Hospital Do-Not-Resuscitate" order if the patient has one.
INFORMATION: Upon admission, UMC must provide the patient, or the person authorized to make treatment decisions on behalf of the patient, information about Advanced Directives and DNR orders.
CONSENT. The consent of the patient or patient’s surrogate decision-maker is necessary for a DNR order except in very limited circumstances. Use the UMC DNR Consent form. This form can be printed by any HUC or nurse and is located on the UMC Intranet with other consent forms.
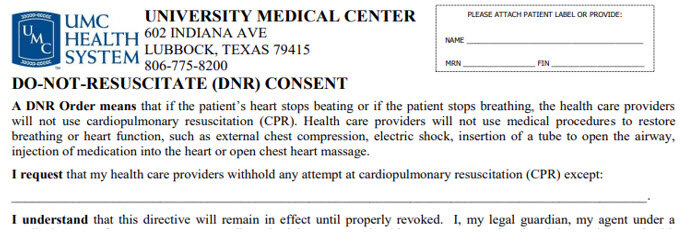
ATTENDING PHYSICIAN: Only an ATTENDING PHYSICIAN may issue a DNR order. The attending Physician is the physician selected by or assigned to a patient who has primary responsibility for a patient's treatment and care. It may include another physician within the primary physician's service who is covering for the primary physician. It does not include resident physicians, fellows, or advanced practice providers. The consent form must be valid, signed, and on the chart PRIOR to placing any order for DNR.
If you have questions, please contact Legal at 761-0995. Michael Economidis is the main point of contact for consent issues, but Lois Wischkaemper and Kristi Ward are also available
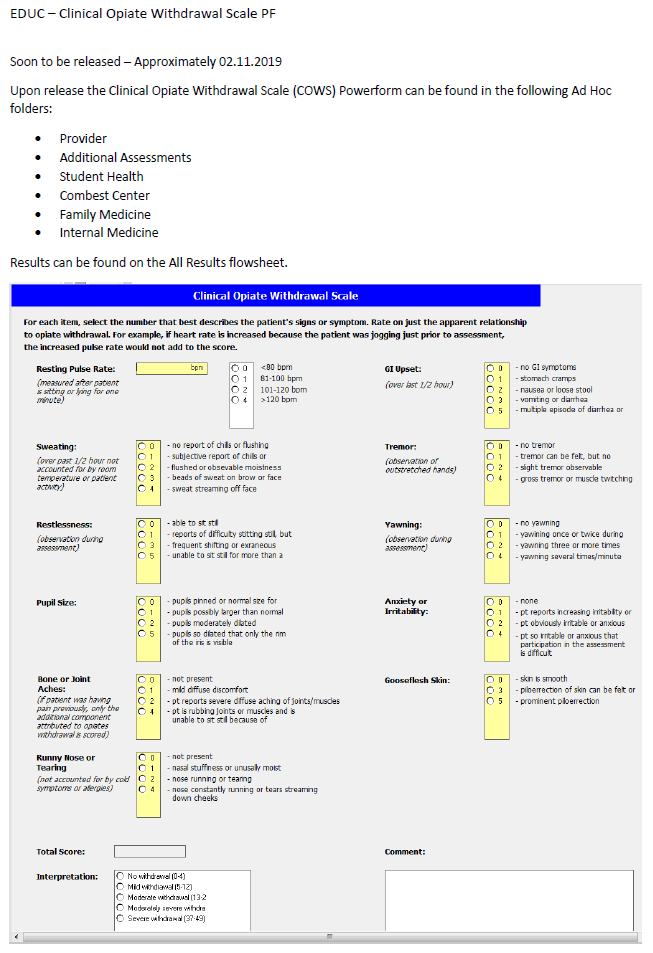
Clinical Opioid Withdrawal Screen (COWS) Powerform
Health Maintenance - Documenting FIT-DNA Results

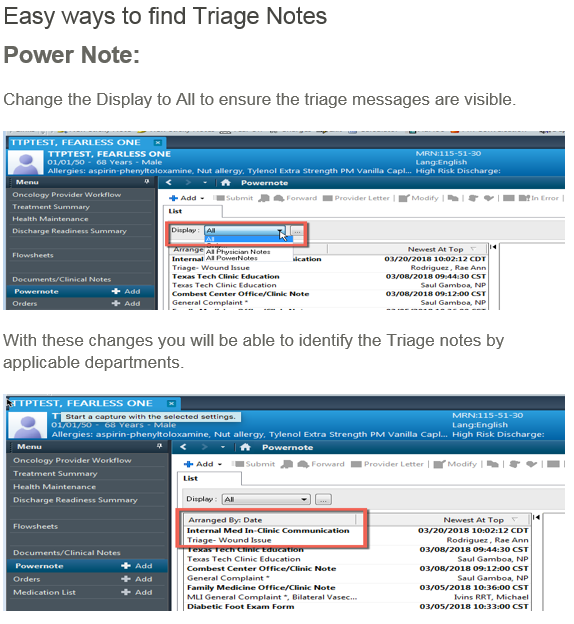
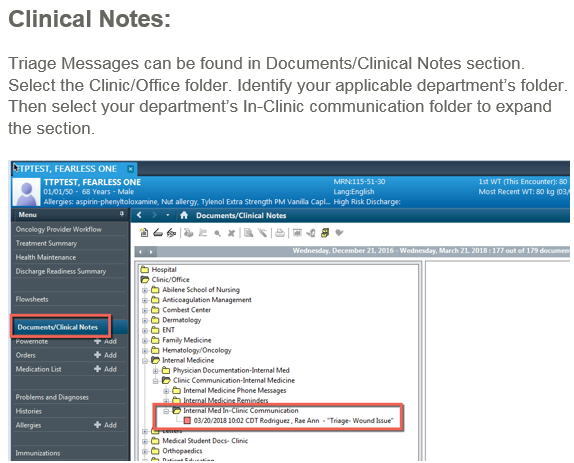
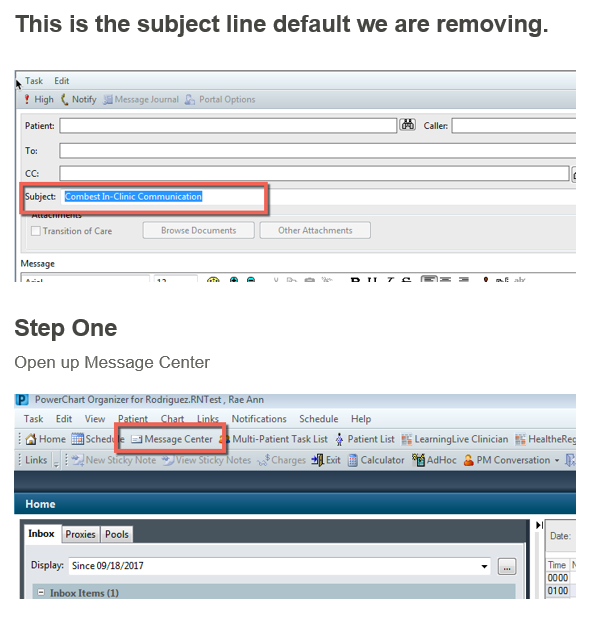
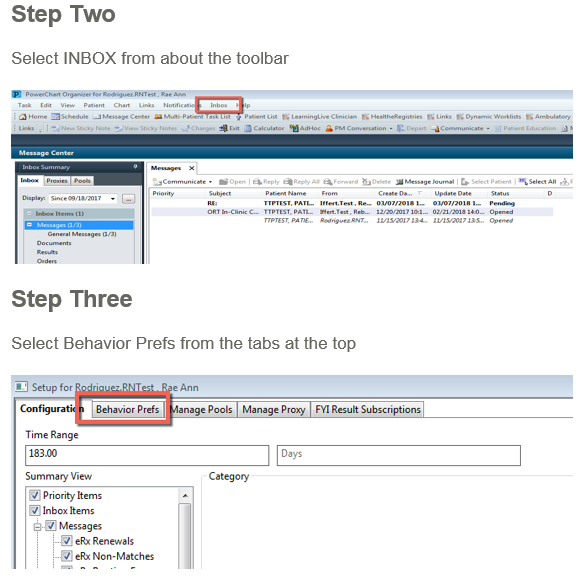
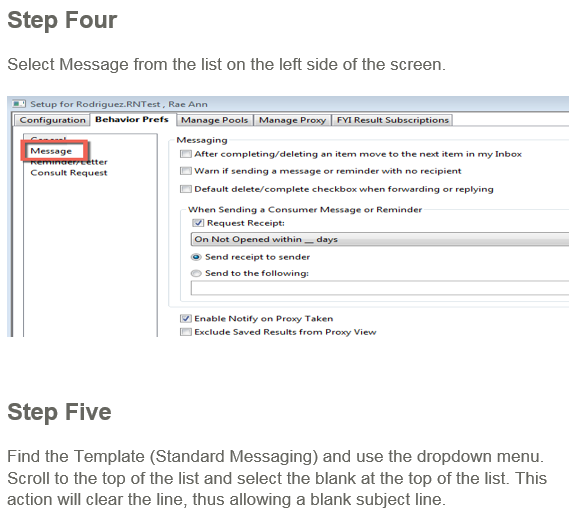
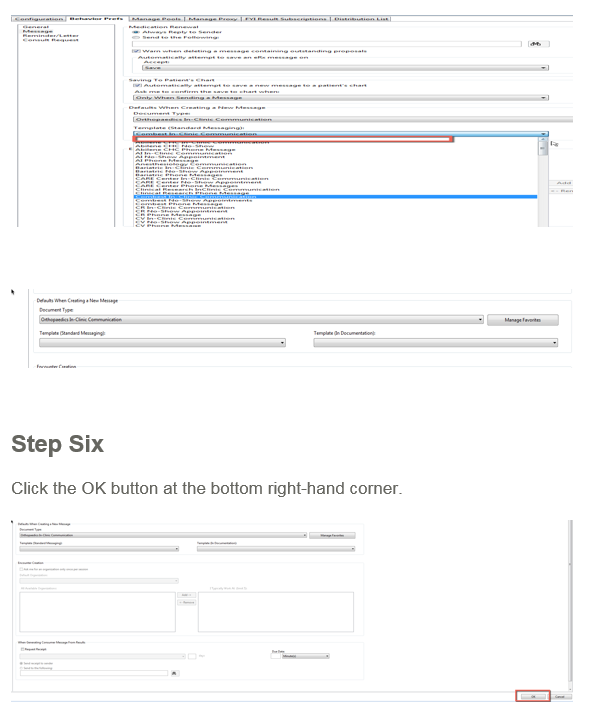
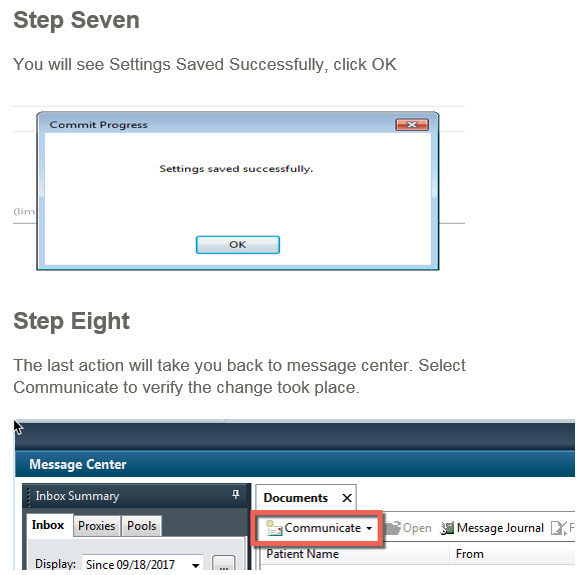
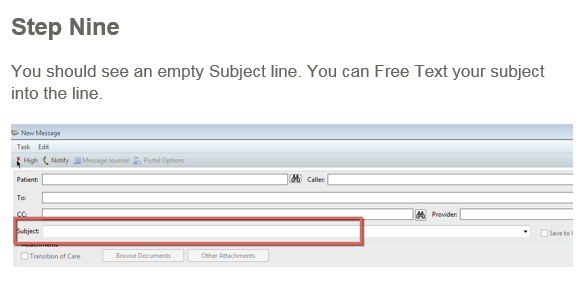
Message Center Preferences-How To Opt Out Of The No-Recipient Warning

Chart Search Functionality
Chart search enables clinicians to search within the patients medical record for information related to the patients medical history.
- You will need to have a patients chart open
- You will need to be on the Summary View page

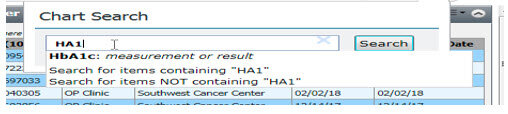
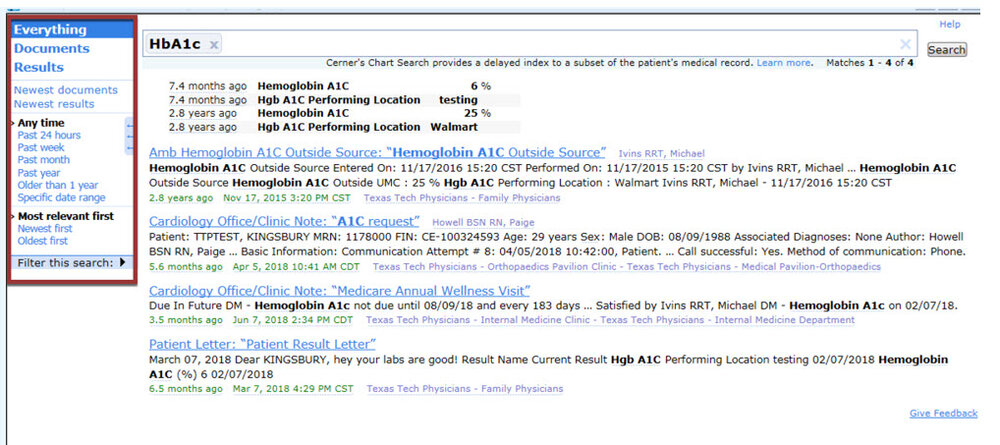
The filter on the left side will assist in narrowing down the search.
The search will assist in finding data faster and improve awareness of patients medical history.
Admin Sex Versus Birth Sex
THIS FUNCTIONALITY WILL BE TURNED ON SOON:
As a part of the 2015 CEHRT (Certified EHR Technology) requirements, administrative sex must be documented separately from birth sex to comply with new HL7 specifications.
Please Note: Administrative sex is used for administrative purposes such as insurance billing.
Birth sex is the sex assigned at birth on the birth certificate that is used for clinical purposes.
Administrative sex is collected during registration in IDX, GE Centricity, or GPMS and is visible in Cerner on the blue banner bar. This sex value can be modified by the appropriate staff when legal documentation is presented. The modification of the administrative sex should only occur within one of the registration systems. Do not alter via a PM Conversation

To Update the Admin/Birth Sex on a patient’s Chart:
Navigate to PM Conversation along the top Tool Bar.
Click on the arrow to open to the options and select Admin/Birth Sex.

Birth sex is visible in the Admin/Birth Sex PM Conversation and will default to the same value as the administrative sex for any new patient that has never had a visit in Cerner. The birth sex value can be modified by the appropriate staff, if needed. Typically, this value is different than administrative sex for patients that have transitioned and can be modified when legal documentation is presented. For example, if a patient is registered and arrived as a female but they were born as a male, the Admin/Birth Sex tool may state, Female/Female. This would need to be updated to reflect Female/Male (Admin/Birth sex).
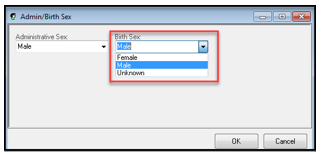
The modification of the birth sex can only occur using Admin/Birth Sex PM Conversation.
As of July 2018, an initial "clean-up" of the admin/birth sex documentation was conducted. From here it is now the responsibility of the individual facilities.
Please feel free to contact any HELP desk with questions
Implant Control
Provider/Nurse documents the IUD in the Implant Hx.
Navigate to the Histories section under the Menu, then over to the Implants Tab.
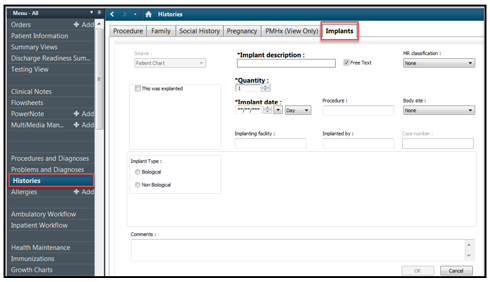
To Manually Add Historical Implant Information
- Click Histories from left Table of Contents
- Select the Implants tab
- Click Add

4. Manually enter all required informatin and any other known information then click the OK button
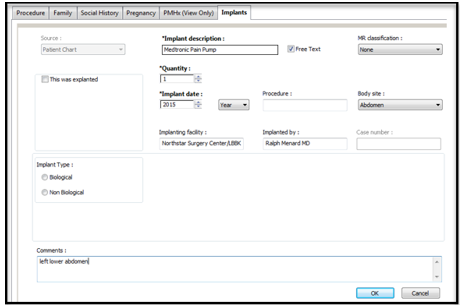
MR Classification field is the MRI Classifications. Some implants may pose a risk in the MRI environment causing the device to malfunction.
- MR Safe- an item that poses no known hazards in all MRI environments; non-conducting, non-metallic, non-magnetic items
- MR Conditional- an item that has been demonstrated to pose no known hazards in a speficied MR environment with specified conditions to use
- MR Unsafe- items that pose a hazard to all MRI environments; inclue magnetic items
Final View

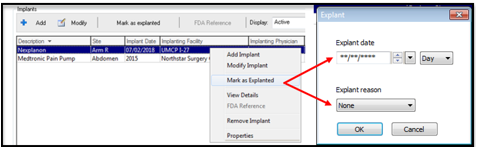
Explanting Devices
When an item is explanted, simply right click over the item and chose Mark as Explanted then fill in the date and explant reason then click OK.
Adjusting Implant Columns
Users might like to see additional columns.
5. Right click over the column name "Description" and click Properties
6. Click the columns you want to see and click Add which will move the filters to the right side
a. The recommendation is to add: Implant Date, Implanting Facility, Implanting Physician, Lot No.,
Expiration Date, and Comments
b. Highlight the Filter to adjust the order of the olumns, the recommended order is seen in the
screenshots below.
7. Click OK to exit the Properties window

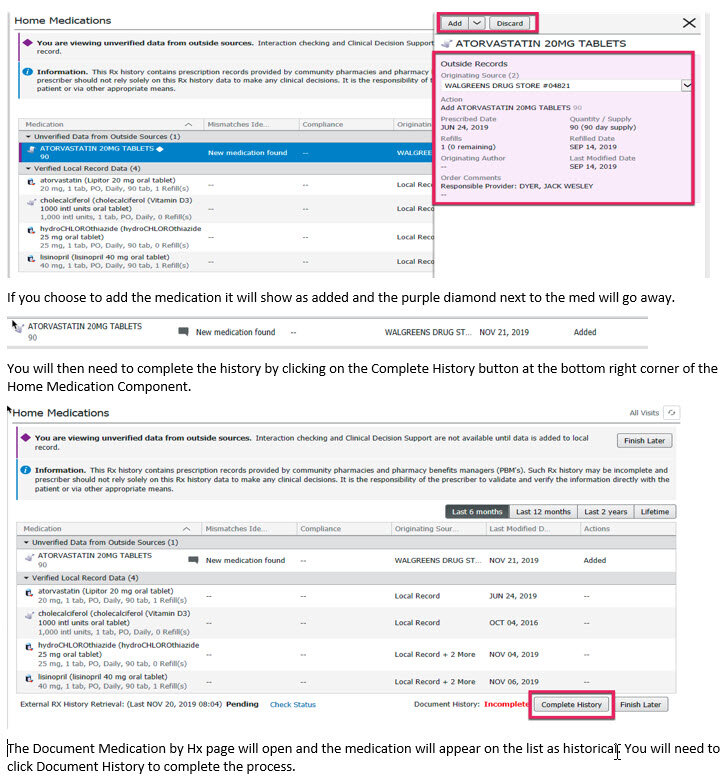
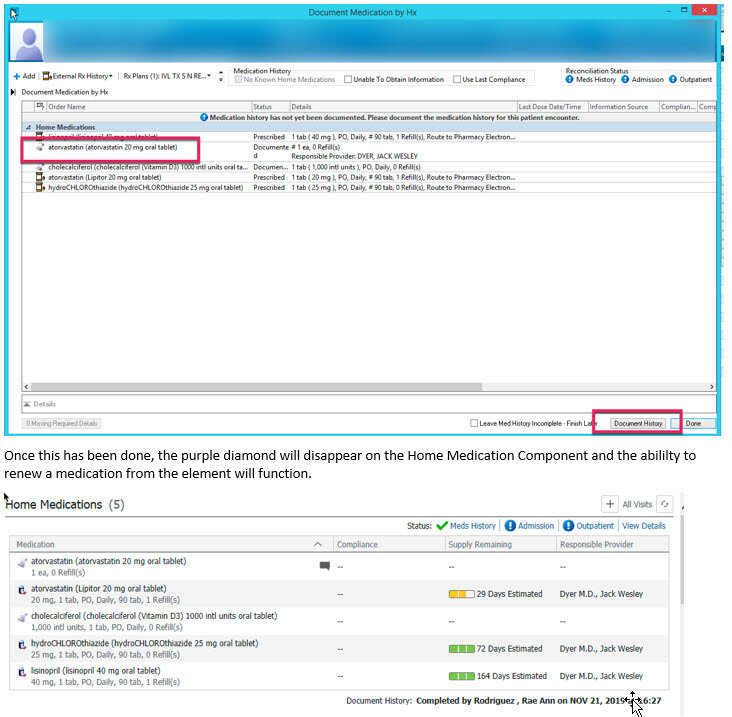
Medication History Snapshot
- Provides static views of a patient’s home medication list at known points in time
- Ability to compare the patient's home medication list at the time they were admitted to after discharge
- View home medication changes from recent Inpatient visits
- See how the patient’s home medication treatments may have changed over time (for example, dosage changes.)
New Medication History Snapshots are created when any of the following actions are taken:
- A prescription or documented home medication order is signed
- Home medication compliance status is added or modified
- The Document Medication by Hx conversation is signed (includes No Known Home Medications or Use Last Compliance)
- The medication history status is reset
- Discharge Medication Reconciliation is signed
Accessible from all PowerOrders navigator views & Documenting Medications by Hx:
Select Orders from the Menu on the left hand side and the Medication History Snapshot is below Medication History

Click Document Medication by History and expand the Document Medication by Hx button:
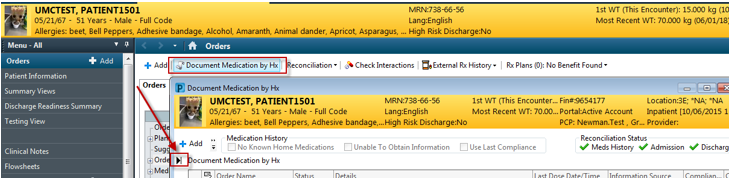
The Medication History Snapshot will now be visible
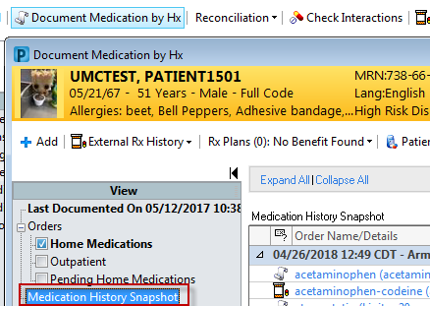

Each snapshot has a header row that specifies the date and time it was generated as well as the user who took an action that resulted in the snapshot being generated
The Medication History Snapshot only includes the list of documented home medications and prescriptions that were active at the time the snapshot was created
Inpatient and ambulatory in-office medications are NOT included
You can change the time frame by selecting This Visit, 6 months, 1 year, or All Visits.
Snapshots can be expanded by clicking the black triangle:

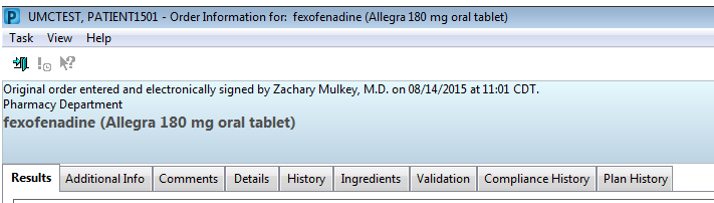
Clicking an order will open the Order Information screen for that specific order
Pooled Cohort Risk Assessment
The Bridges to Excellence programs for Diabetic and Cardiovascular health dictate that a cardiovascular assessment be performed on patients using the Pooled Cohort Risk Assessment tool.
American Diabetes Association (ADA) and ACC/AHA 2015 guidelines recommended that all diabetic patients age 40-75 have their 10-year cardiovascular risk assessed using the Pooled Cohort risk calculator.
We can access this risk assessment calculator though Powerchart.
- · With patient chart open, click Clinical Calculator from left menu
- · Click Cardiology (you can choose to set this as a default if you wish)
- · Click ACC/AHA 2013 Cardiovascular Risk Assessment
- · Fill in information then click Copy to Clipboard
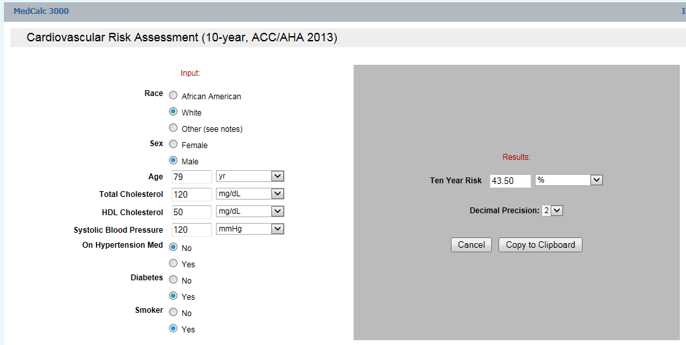
- · Once you open the Powernote, decide where you want to insert the information.
- · Click OTHER to open a free text box. Right click & paste the assessment.
- · You will want to remove the References from the text. You can also remove the answers
- you filled in and simply leave the title of the assessment and the result.
In this example, the assessment result is inserted into the Review/Management section

Becki Tipton (UMCP)_4.19.18