Admin Sex Versus Birth Sex
THIS FUNCTIONALITY WILL BE TURNED ON SOON:
As a part of the 2015 CEHRT (Certified EHR Technology) requirements, administrative sex must be documented separately from birth sex to comply with new HL7 specifications.
Please Note: Administrative sex is used for administrative purposes such as insurance billing.
Birth sex is the sex assigned at birth on the birth certificate that is used for clinical purposes.
Administrative sex is collected during registration in IDX, GE Centricity, or GPMS and is visible in Cerner on the blue banner bar. This sex value can be modified by the appropriate staff when legal documentation is presented. The modification of the administrative sex should only occur within one of the registration systems. Do not alter via a PM Conversation

To Update the Admin/Birth Sex on a patient’s Chart:
Navigate to PM Conversation along the top Tool Bar.
Click on the arrow to open to the options and select Admin/Birth Sex.

Birth sex is visible in the Admin/Birth Sex PM Conversation and will default to the same value as the administrative sex for any new patient that has never had a visit in Cerner. The birth sex value can be modified by the appropriate staff, if needed. Typically, this value is different than administrative sex for patients that have transitioned and can be modified when legal documentation is presented. For example, if a patient is registered and arrived as a female but they were born as a male, the Admin/Birth Sex tool may state, Female/Female. This would need to be updated to reflect Female/Male (Admin/Birth sex).
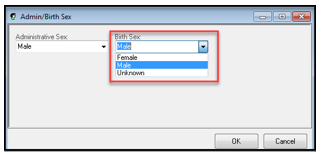
The modification of the birth sex can only occur using Admin/Birth Sex PM Conversation.
As of July 2018, an initial "clean-up" of the admin/birth sex documentation was conducted. From here it is now the responsibility of the individual facilities.
Please feel free to contact any HELP desk with questions
Implant Control
Provider/Nurse documents the IUD in the Implant Hx.
Navigate to the Histories section under the Menu, then over to the Implants Tab.
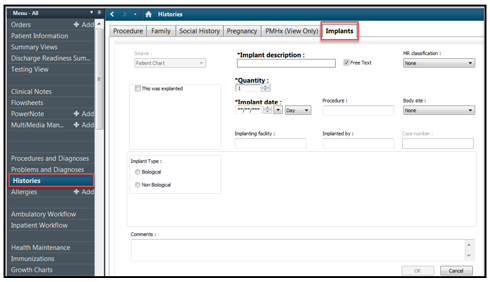
To Manually Add Historical Implant Information
- Click Histories from left Table of Contents
- Select the Implants tab
- Click Add

4. Manually enter all required informatin and any other known information then click the OK button
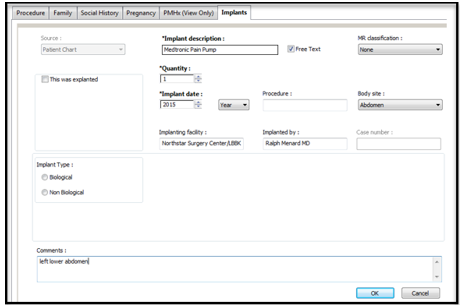
MR Classification field is the MRI Classifications. Some implants may pose a risk in the MRI environment causing the device to malfunction.
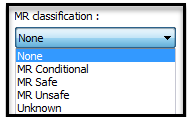
- MR Safe- an item that poses no known hazards in all MRI environments; non-conducting, non-metallic, non-magnetic items
- MR Conditional- an item that has been demonstrated to pose no known hazards in a speficied MR environment with specified conditions to use
- MR Unsafe- items that pose a hazard to all MRI environments; inclue magnetic items
Final View

Explanting Devices
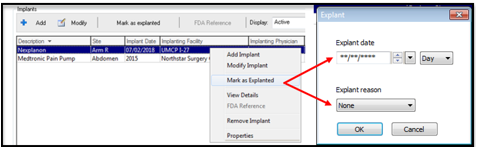
When an item is explanted, simply right click over the item and chose Mark as Explanted then fill in the date and explant reason then click OK.
Adjusting Implant Columns
Users might like to see additional columns.
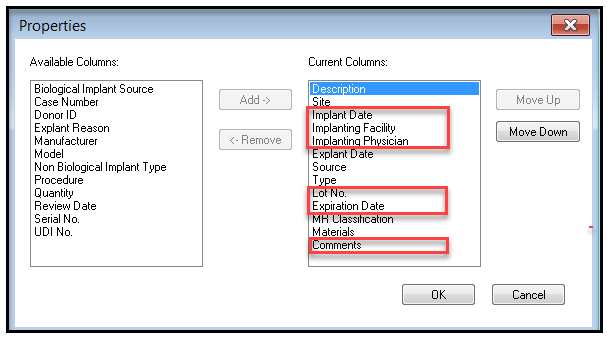
5. Right click over the column name "Description" and click Properties
6. Click the columns you want to see and click Add which will move the filters to the right side
a. The recommendation is to add: Implant Date, Implanting Facility, Implanting Physician, Lot No.,
Expiration Date, and Comments
b. Highlight the Filter to adjust the order of the olumns, the recommended order is seen in the
screenshots below.
7. Click OK to exit the Properties window
Provider Documentation: Ad Hoc Charting
Documenting using Ad Hoc Forms:
1) In the patients chart click Ad Hoc
2) Select the Provider folder
3) Check the desired forms and select Chart
4) Document necessary fields. Yellow fields are required and must be documented in order to sign the form.
5) Click the green “” in the top left corner of the form.

Identifying or Disconnecting a Citrix Server
In the bottom right-hand corner of your screen, search for the hidden icons arrow, or the icon for Citrix Receiver.
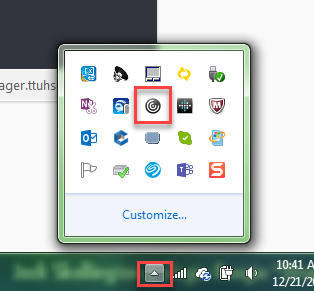
Right-click on the receiver icon and select the connection center

Highlight the active sessions you may have up and “disconnect” each one
When finished, close out and try opening PowerChart again
Note: this is also a way to tell what server you are on for future trouble-shooting calls with the HELP Desks

Orders: Trouble Shooting Unable for Discharge (Resident Workflow)


Setting Filter on PowerNote
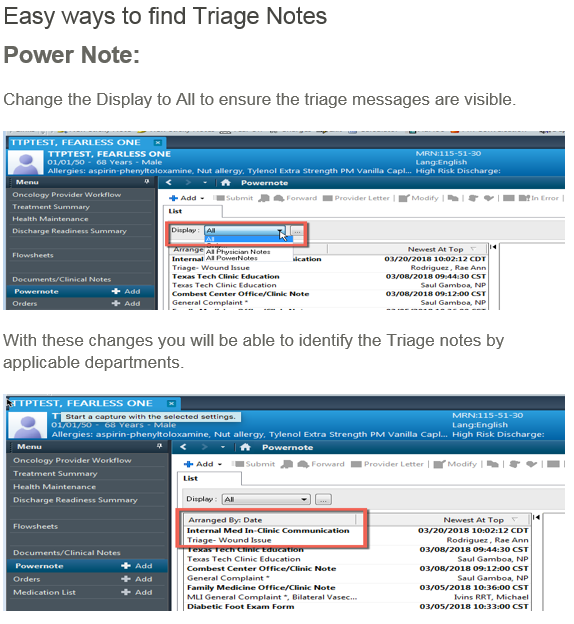
Instructions to view ALL the provider notes (notes created using Powernote, Powerchart Touch, and Clinical Notes) click on Powernote:
Look at the List view and under Display and choose the dropdown arrow.
Set it to “All Physician Notes”.

Adding PowerNotes Into PowerChart
Navigating PowerNote View and Add PowerNote Screen:
Basic PowerNote Creation:
PowerChart: Tour for Medical Students
OpenNotes: Using the Unpublished Option
Preface: The use of the "unpublished" option is ONLY for the rare documentation need to withhold a particular note from the portal. This is NOT for everyday clinical note use.


Security-Privacy-Restricted Communication


How to Save a Favorite PowerPlan


Password Self Service


How to Add or Manage a Patient List


Printing Report for Multiple Patients

How to Proxy a Patient List


Registration for New UpToDate Account


Name Format in PowerChart
 To help in further standardizing how things look and act in PowerChart, name formatting will be updated soon.
The new personal display will appear as follows:
First [Middle] Last [Suffix], [Credentials]
(Anything in the brackets will only show if applicable, i.e. not everyone has credentials)
This will affect the display when searching for providers as listed below. You will be allowed to search by last name or first name. If you search by first name only the system will interpret this as last name so please enter at least a portion of first name and a portion of the last name. This will make the system look for first name and last name.
Last name, first name

First name, last name


Random Searching with Binoculars


